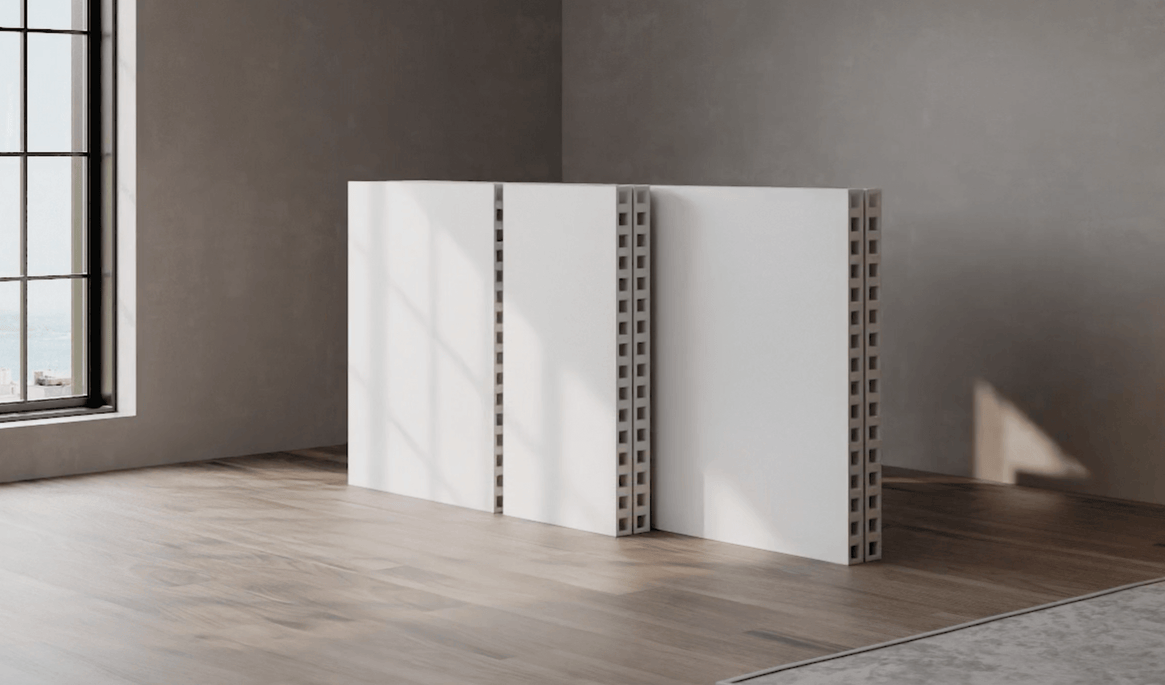
Freestanding Partition Wall With Door

Perfect for making two rooms out of one, the Freestanding Partition Wall With Door includes everything you need to assemble a sleek, modern, modular wall with a door anywhere in your home. Anchor Panels on each end make for complete stability, while the included Door Kit provides sound dampening and privacy. 

Assembly is a breeze, as every panel snaps together with included Lug Connectors and 2-Way Connectors. Simply insert, click together, and you're done! 

As the wall system is modular, it can be moved, reused, and reconfigured endlessly, providing endless flexibility to suit your changing needs.

Need a custom size? Contact Us via live chat, email, or phone!

Wall + Anchor Panels

Our signature Wall and Anchor Panels are 3" thick and made of Moisture and Impact Resistant Fiberglass. These panels are easily assembled at home and snap together using Lug and 2-Way Connectors for a stable and secure fit. This freestanding wall kit is stabilized with 2ft wide anchor panels attached to each end of the wall. 

Accordion Door Kit

The included accordion door kit is 36" wide and either 84" or 96" in height, depending on the height of the wall you purchase. The kit includes a specialized lintel piece with a track that allows the door to be easily assembled, installed, opened and closed. Simply slot the folding door into the track and install it between two modular wall panels by sliding the door’s lintel over two connector lugs placed into the two wall panels. Each door includes two thresholds, a double-sided handle, and an integrated magnet to hold the door in position when closed.

For detailed instructions on the door installation, see the "Assembly" tab above.

Lug Connectors

Your kit includes Lug Connectors, which snap into the side of each panel and make for an extremely secure two-way connection between panels.

2-Way Connectors

Panels are held together using Lug Connectors, but also 2-Way Connectors, which keep them attached at the top and bottom. Just like the Lug Connectors and Finishing Caps, these connectors snap securely into the receiving holes found on all modular panels. 

Finishing Caps

Finishing caps are used to close off any exposed connector holes, giving the exterior of your wall a clean, finished look! Your kit includes enough caps to seal off the entire perimeter of your wall. For walls above 6'6" in height, finishing caps for the top are not included, as the top is out of view. Extra finishing caps can be purchased from our 'Accessories' page.

Before you buy, the most important thing to do is measure your ceiling height. Your ceiling must be at least 2" higher than the height of your partition. For example, if you're looking to buy an 8' partition, your ceiling must be at least 8'2". This allows you to assemble the partition comfortably and place it in your space. Without any clearance, you're at risk of not being able to assemble/install the partition at all, which we don't want!

Do also make sure to check your floor for dips and bulges. Uneven flooring can impact the installation of your product.

Once you've confirmed your ceiling height and ensured your floor is level, you're good to go.

Door Positioning
By default doors are placed in the most economical position. If you have a preference for the placement of the door, please reach out to us, and we can check if that is possible with your dimensions, or if we can do a custom order for you. 

Note that doors do need to have a least 1ft of wall panel on each side. 

Our wall kits are designed to be completely DIY. Two people can typically assemble and install any of our wall kits in 90 minutes or less, with little to no tools needed.

Note that a drill and/or screwdiver is recommended for installing the accordion doors and mounting the wall kit to your existing walls. 

PDF Assembly Guides

• Modular Wall Kits Assembly Instructions.pdf

• Accordion Door Installation Instructions.pdf 

Video Assembly Guides (More to come)

• Freestanding L-Shaped Partition Wall w/ Door

• Mounted L-Shaped Partition Wall w/ Door

• Pony Wall/Partition Room Divider

• L-Shaped Partition Room Divider

• L-shaped Modular Office Cubicle

DIY ASSEMBLY

Assemble and install in as little as an hour with minimal tools

FLEXIBILITY

Modular, flexible, and only as permanent as you want it to be

Perfect for making two rooms out of one, the Freestanding Partition Wall With Door includes everything you need to assemble a sleek, modern, modular wall with a door anywhere in your home. Anchor Panels on each end make for complete stability, while the included Door Kit provides sound dampening and privacy. 

Assembly is a breeze, as every panel snaps together with included Lug Connectors and 2-Way Connectors. Simply insert, click together, and you're done! 

As the wall system is modular, it can be moved, reused, and reconfigured endlessly, providing endless flexibility to suit your changing needs.

Need a custom size? Contact Us via live chat, email, or phone!

Wall + Anchor Panels

Our signature Wall and Anchor Panels are 3" thick and made of Moisture and Impact Resistant Fiberglass. These panels are easily assembled at home and snap together using Lug and 2-Way Connectors for a stable and secure fit. This freestanding wall kit is stabilized with 2ft wide anchor panels attached to each end of the wall. 

Accordion Door Kit

The included accordion door kit is 36" wide and either 84" or 96" in height, depending on the height of the wall you purchase. The kit includes a specialized lintel piece with a track that allows the door to be easily assembled, installed, opened and closed. Simply slot the folding door into the track and install it between two modular wall panels by sliding the door’s lintel over two connector lugs placed into the two wall panels. Each door includes two thresholds, a double-sided handle, and an integrated magnet to hold the door in position when closed.

For detailed instructions on the door installation, see the "Assembly" tab above.

Lug Connectors

Your kit includes Lug Connectors, which snap into the side of each panel and make for an extremely secure two-way connection between panels.

2-Way Connectors

Panels are held together using Lug Connectors, but also 2-Way Connectors, which keep them attached at the top and bottom. Just like the Lug Connectors and Finishing Caps, these connectors snap securely into the receiving holes found on all modular panels. 

Finishing Caps

Finishing caps are used to close off any exposed connector holes, giving the exterior of your wall a clean, finished look! Your kit includes enough caps to seal off the entire perimeter of your wall. For walls above 6'6" in height, finishing caps for the top are not included, as the top is out of view. Extra finishing caps can be purchased from our 'Accessories' page.

Before you buy, the most important thing to do is measure your ceiling height. Your ceiling must be at least 2" higher than the height of your partition. For example, if you're looking to buy an 8' partition, your ceiling must be at least 8'2". This allows you to assemble the partition comfortably and place it in your space. Without any clearance, you're at risk of not being able to assemble/install the partition at all, which we don't want!

Do also make sure to check your floor for dips and bulges. Uneven flooring can impact the installation of your product.

Once you've confirmed your ceiling height and ensured your floor is level, you're good to go.

Door Positioning
By default doors are placed in the most economical position. If you have a preference for the placement of the door, please reach out to us, and we can check if that is possible with your dimensions, or if we can do a custom order for you. 

Note that doors do need to have a least 1ft of wall panel on each side. 

Our wall kits are designed to be completely DIY. Two people can typically assemble and install any of our wall kits in 90 minutes or less, with little to no tools needed.

Note that a drill and/or screwdiver is recommended for installing the accordion doors and mounting the wall kit to your existing walls. 

PDF Assembly Guides

• Modular Wall Kits Assembly Instructions.pdf

• Accordion Door Installation Instructions.pdf 

Video Assembly Guides (More to come)

• Freestanding L-Shaped Partition Wall w/ Door

• Mounted L-Shaped Partition Wall w/ Door

• Pony Wall/Partition Room Divider

• L-Shaped Partition Room Divider

• L-shaped Modular Office Cubicle

This wall system was the easiest to build. We took a messy unused room and created a useable extra room

Andrew K.

Just got it set up! Perfect for sectioning off our basement. Everything as described. Thanks!

Geoff R.

Easy to assemble and great customer service. The perfect solution if you need a quality room divider.

Matthew P.

The L-shaped partition room divider was the perfect solution! Super easy to install. Looks great for video calls

Jorge L.

Used the L Shaped wall to hide a mailbox area. Super easy to put together. Looks amazing with decal!

Rebecca W.

It's solid and stability is great. It looks great and clean. Thank you for the support when I needed it.

Jetty H.

FREE SHIPPING ON ALL ORDERS

Assembly As Easy As

How it Works

The Panels

Each panel consists of two rigid fibreglass composite panels, adhered to a unique interior frame system, forming a lightweight, yet structural wall panel

Order a 1'x1' Sample Panel
Panel Connectors

Interpanel Connectors allow you to attach panels at the top and bottom of each frame, making for an ultra-secure fit.

Vertical Stacking

Patented Lug Connectors make vertical stacking of panels easy, safe, and secure. Simply push connectors into place and attach panels vertically.

Accordion Doors

The accordion door includes a lintel, handle, and a snap channel to latch the door into a closed position. Installation requires a screwdriver.

Finish the Look

Finishing Caps snap into receiver holes located on all sides of each panel, sealing off the hole and providing a sleek and finished look.

Mounting

Screw the Wall Mounting Bracket to the fixed wall, nest the panel inside the L, and screw the channel to the panel. We recommend utilizing this mounting method if possible

Customer Reviews

Based on 3 reviews
100%
(3)
0%
(0)
0%
(0)
0%
(0)
0%
(0)
D
David (Rancho Cucamonga, CA)
Great Staff and Products!

Friendly and very helpful team! Highly recommend their products.

Hi David,

Thanks a bunch for your review! We're thrilled to hear you had a great experience with our team and are happy with our products. Your recommendation means a lot to us. If there's anything else you need, we're always here to help!

R
Rena C. (Boston, MA)
A Breeze to Assemble, Like Lego Blocks!

Bought a Freestanding Wall with door for my apartment. Setting it up was super easy, kinda like building with Legos! But, getting a friend to help hold the pieces makes it way smoother. Really happy with it, does the job and looks good!

Hi Rena,

So glad to hear that you found the assembly process to be a breeze and you're happy with the result! Great tip about having a friend help out – teamwork makes the dream work! Thanks for choosing us, and enjoy your new space!

D
David (Rancho Cucamonga, CA)
Great addition to my home!

Thanks Chris and Ron for helping me select the best product for my home!

Thanks for the review David! It was a pleasure helping you out!